Zentyal As A Gateway : For Load Balancing
abhishek-kumar
28 Jun 2016 06:24 AM
1. What is Zentyal? 2. Perfect Setup of load balancing with zentyal. Zentyal is the Linux Small Business Server, it lets you manage all your network services through one single platform. It's a Network Gateway, as well as an Infrastructure, UTM (Unified Threat Manager), Office and Communications Server. All these features are fully integrated and easy to configure, it truly helps to save system administrators time. The Zentyal server, which originated in Spain, has been around for many years and is no stranger to the Ubuntu realm. In fact, the system began as a graphical interface on the Ubuntu server. The company has since been offering the server as a standalone product and in both 32- and 64-bit variants. Main features of Zentyal Server :  Steps to Install zentyal community edition 4.0 through CD: 1. Boot the system with DVD or USB, and select language. 2. Choose language to be used for installation procedure. 3. Select your country. 4. Configure KeyBoard select . 5. Provide hostname. For example: Zentyal 6. Provide username to your Zentyal Server and assign password . 7. Select Time Zone, next few steps will run automatically and system files will be installed. 8. Once installation is completed, system will reboot automatically. 9. Now, the Administration GUI Screen on Zentyal Desktop will appear,then login with their username and password . 10. After That Install Some depended Packages and Features according to your requirment Like DHCP , DNS , Firewall , Domain Controller And File Sharing , Traffic Shaping Etc. Network : Example With Diagram :
 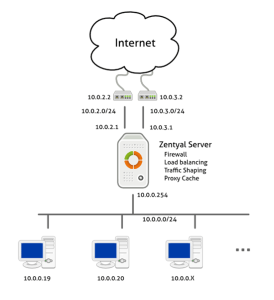 As shown in the scenario, you have to configure three network interfaces, two external routers and one for the internal network. Zentyal will balance traffic between the two Internet connections. Configure Zentyal For Load Balancing : Steps for Configuration Of External or Internal Network Interface : 1 . Go to Network -> Interfaces
 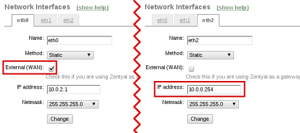 2 . Configure External Network Click on First Network Interface (eth 0). To Make it External Network do following Setup:
- Native compatibility with Microsoft® Exchange Server Protocols
- Support for Microsoft Outlook® 2007, 2010
- Native compatibility with Microsoft Active Directory® 2008, 2008R2, 2012
- Email, calendars, contacts
- Synchronization with mobile devices (ActiveSync® support)
- Antivirus and Antispam
- Packaged in an Ubuntu-based server, providing domain and directory, basic networking and firewall services.
- Hard Disk - 320 GB
- Ram - 8GB
- Lan Card - 3 (If You want to Configure Load Balancing between two modem )
- Using Zentyal installer that you can download from the project website. This is the recommended choice, it includes all package dependencies for offline install and also makes some custom configuration.
- Install on top of a working Ubuntu Server through command.
Steps to Install zentyal community edition 4.0 through CD: 1. Boot the system with DVD or USB, and select language. 2. Choose language to be used for installation procedure. 3. Select your country. 4. Configure KeyBoard select . 5. Provide hostname. For example: Zentyal 6. Provide username to your Zentyal Server and assign password . 7. Select Time Zone, next few steps will run automatically and system files will be installed. 8. Once installation is completed, system will reboot automatically. 9. Now, the Administration GUI Screen on Zentyal Desktop will appear,then login with their username and password . 10. After That Install Some depended Packages and Features according to your requirment Like DHCP , DNS , Firewall , Domain Controller And File Sharing , Traffic Shaping Etc. Network : Example With Diagram : As shown in the scenario, you have to configure three network interfaces, two external routers and one for the internal network. Zentyal will balance traffic between the two Internet connections. Configure Zentyal For Load Balancing : Steps for Configuration Of External or Internal Network Interface : 1 . Go to Network -> Interfaces 2 . Configure External Network Click on First Network Interface (eth 0). To Make it External Network do following Setup: - Name - eth0
- Method - Static
- Check The checkbox as External (WAN)
- IP Address : 192.168.0.1
- Subnet Mask : 255.255.255.0
- Name - eth1
- Method - Static
- Check The checkbox as External (WAN)
- IP Address : 192.168.1.1
- Subnet Mask : 255.255.255.0
- Name - eth2
- Method - Static
- IP Address : 192.168.3.1
- Subnet Mask : 255.255.255.0
- Go To Network -> Gateways
- Click on Add New under Gateway List
- Checkbox checked (Enable)
- Name - Modem 1
- Provide IP Address
- Checkbox checked as (Default)
- Checkbox checked (Enable)
- Name - Modem 2
- Provide IP Address
- Checkbox checked (Enable)
- Set Time 1 Minute
- IP Address : 192.168.3.2
- Subnet Mask : 255.255.255.0
- Gateway : 192.168.0.3
- Dns Server : 192.168.0.3, 192.168.1.3